The Jupyter notebook is ready for the development. Let’s write PySpark code to work with Redshift Data in the Data Lake.
-
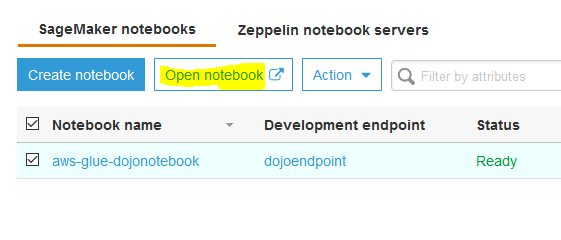
Goto the AWS Glue console, click on the Notebooks option in the left menu, then select the notebook and click on the Open notebook button.
-
On the next pop-up screen, click the OK button. It will open jupyter notebook in a new browser window or tab. In the notebook window, click on Sparkmagic (PySpark) option under the New dropdown menu.

-
It will open notebook file in a new browser window or tab. Copy and paste the following PySpark snippet (in the black box) to the notebook cell and click Run. It will create Glue Context. The Glue context connects with the Spark session and also provides access to the data lake catalog tables.
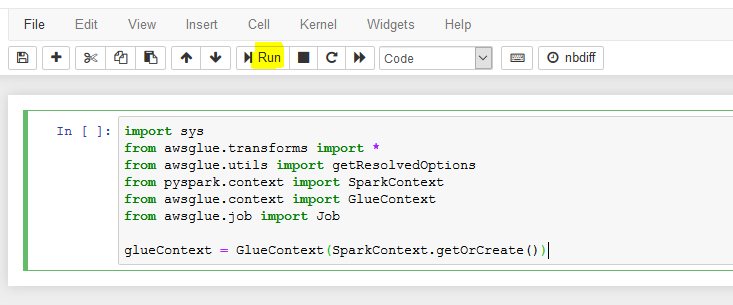
import sys
from awsglue.transforms import *
from awsglue.utils import getResolvedOptions
from pyspark.context import SparkContext
from awsglue.context import GlueContext
from awsglue.job import Job

glueContext = GlueContext(SparkContext.getOrCreate())
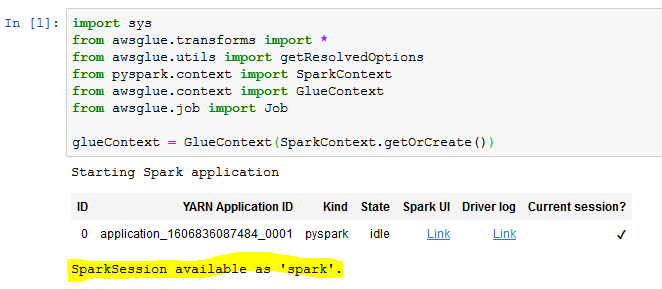
- It takes some time to start SparkSession and get Glue Context. Wait for the confirmation message saying SparkSession available as ‘spark’..
- Next Run the following PySpark code snippet which loads data in the Dynamicframe dojodf from the dev_public_dojotable catalog table in the dojodb database. If you created S3 bucket with a different name, replace dojo-rs-bkt with that name for the temporary folder parameter.
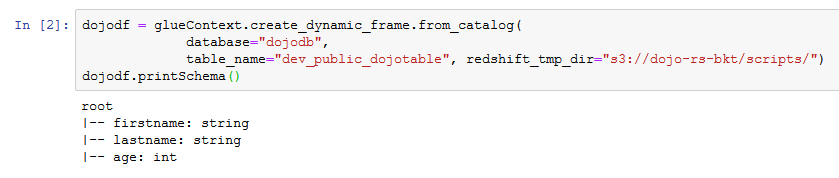
dojodf = glueContext.create_dynamic_frame.from_catalog(
             database="dojodb",
             table_name="dev_public_dojotable", redshift_tmp_dir="s3://dojo-rs-bkt/scripts/")
dojodf.printSchema()
- Run the following PySpark code snippet which selects firstname and lastname fields from the dojodf dynamic frame to create a new dynamic frame dojodfmini.

dojodfmini = SelectFields.apply(dojodf,["firstname","lastname"])
dojodfmini.printSchema()
- Next Run the following PySpark code snippet to write dojodfmini data to the s3 bucket in the CSV format. If you created S3 bucket with a different name, replace dojo-rs-bkt with that name for the destination location parameter. Once you run the code, you can check the data in s3://dojo-rs-bkt/data folder.

glueContext.write_dynamic_frame.from_options(dojodfmini, connection_type = "s3", connection_options = {"path": "s3://dojo-rs-bkt/data"}, format = "csv")
- Next Run the following PySpark code snippet to write dojodfmini data to the Redshift database with the table name dojotablemini. Once you run the code, you can check the table dojotablemini in the dev database in the Redshift cluster. If you created S3 bucket with a different name, replace dojo-rs-bkt with that name for the temporary folder parameter.

glueContext.write_dynamic_frame.from_jdbc_conf(dojodfmini, catalog_connection = "dojoconnection",
                                                   connection_options = {"dbtable": "dojotablemini", "database": "dev"},
                                                   redshift_tmp_dir = "s3://dojo-rs-bkt/scripts/")
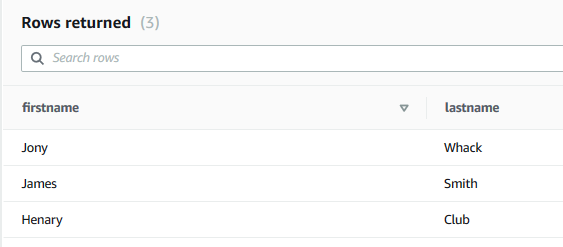
- You can use query editor in the Redshift cluster to check the dojotablemini table and its data.
- This finishes the workshop. Follow the next step to clean-up the resources so that you don’t incur any cost post the workshop.