Using Amazon Data Migration Services with S3
AWS Database Migration Service helps in migrating databases to AWS quickly and securely. The source database remains fully operational during the migration, minimizing downtime to applications that rely on the database. AWS Database Migration Service supports both homogeneous migrations such as Oracle to Oracle and heterogeneous migrations between different database platforms, such as Oracle or Microsoft SQL Server to Amazon Aurora.
In this exercise, you learn how to migrate data from a relational database to S3 bucket.
The AWS Resource consumption for the exercise does not falls under AWS Free Tier.
Step1: Pre-Requisite
You need to have an AWS account with administrative access to complete the exercise. If you don’t have an AWS account, kindly use the link to create free trial account for AWS.
Step2: Create S3 bucket and IAM Role
You create S3 bucket where the data migration service (DMS) will migrate the data from the relational database. You also create IAM Role for DMS which authorizes DMS service to make call to other AWS Services.
-
Login to the AWS Console and select Ireland as the region.
-
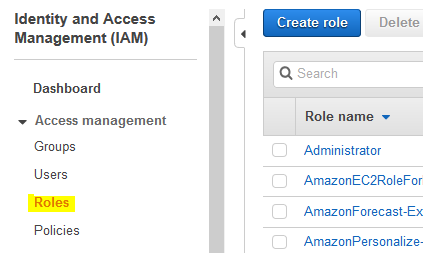
Goto the IAM Management console and click on the Roles menu in the left and then click on the Create role button.
-
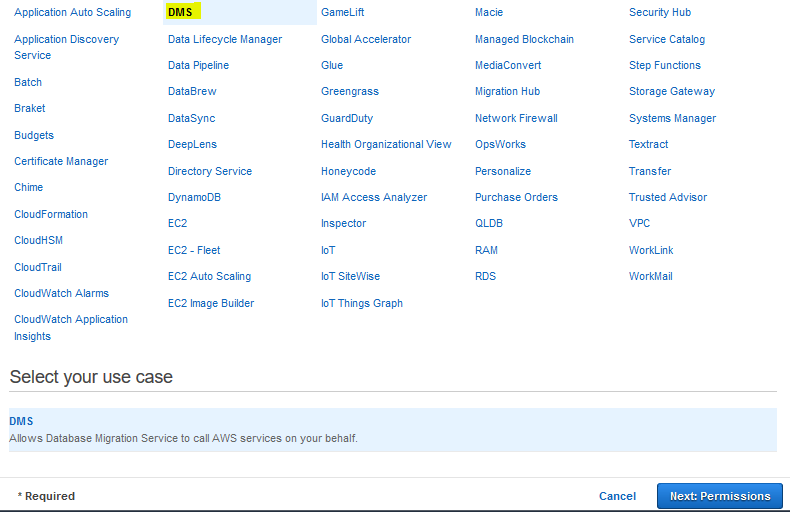
On the next screen, select DMS as the service and click on the Next: Permissions button.
-
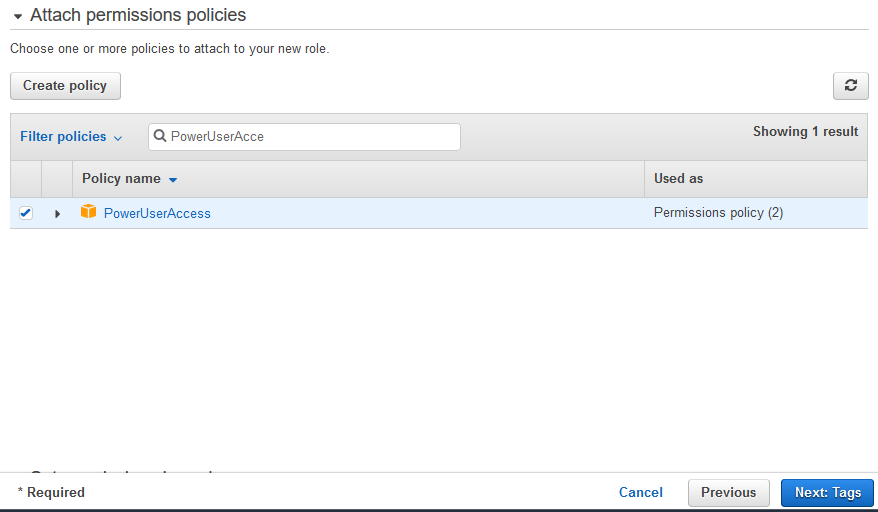
On the next screen, select PowerUserAccess as the policy and click on the Next: Tags button. The exercise is using power user permission but in actual production use it is recommended to use minimum required permission only.
-
On the next screen, click on the Next: Review button.
-
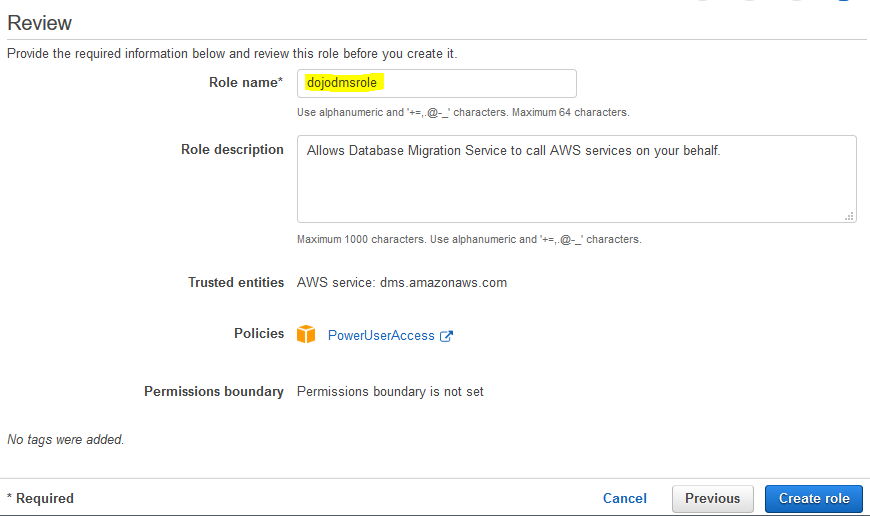
On the next screen, type in dojodmsrole for the Role name and click on the Create role button.
-
The role is created in no time. Make note of the role ARN as you need it later when configuring DMS.
-
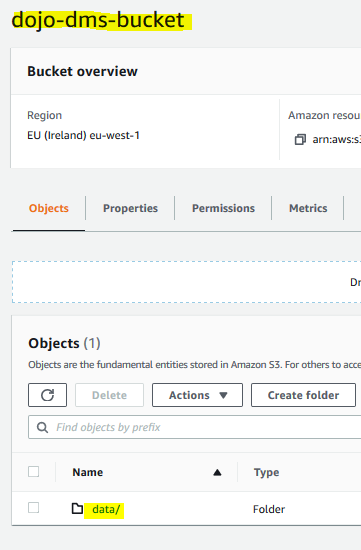
The next step is to create the S3 bucket and folder. Go to the S3 Management Console and create a S3 bucket with name dojo-dms-bucket. If the bucket name is not available, then use a name which is available. In this bucket, create data folder.
-
The IAM Role and Bucket are ready. Let’s create security group which is used by the relational database instance to firewall the access.
Step3: Create Security Group
You create security group in the default VPC which then used by the relational database instance to firewall the access.
-
Goto the VPC Management console and click on the Security Groups menu in the left and then click on the Create security group button.

-
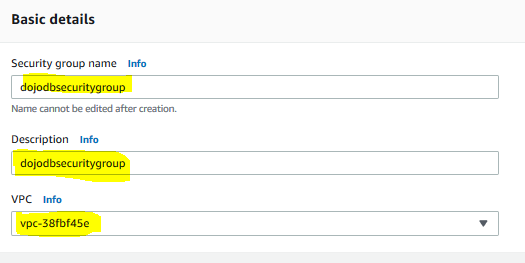
On the next screen, type in dojodbsecuritygroup for the security group name and description fields. Select default VPC for the VPC. Then click on the Add rule button for the Inbound rules.
-
On the same screen, for the Inbound rules, select MYSQL/Aurora for the type. Type in 0.0.0.0/0 for the source. Finally click on the Create security group button.

-
The security group is created in no time. Let’s launch the Aurora RDS instance in the next step.
Step4: Create MySQL RDS Instance
You launch Aurora RDS instance which works as the source database instance for the exercise.
-
Goto the RDS Management console and click on the Create database button.

-
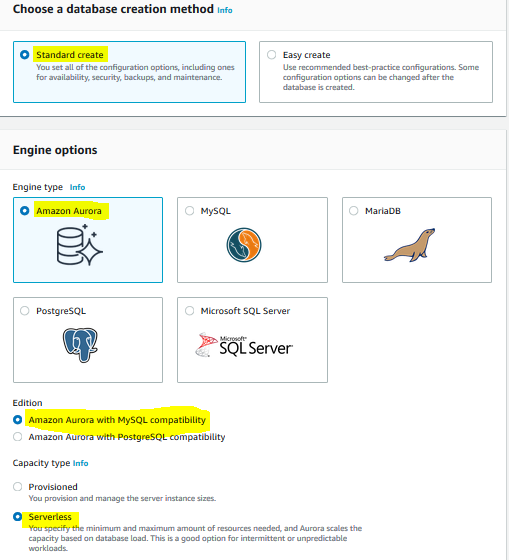
On the next screen, select Standard create for the creation method. Select Amazon Aurora for the engine type. Select Amazon Aurora with MySQL compatibility for the edition. Select Serverless for the capacity type.
-
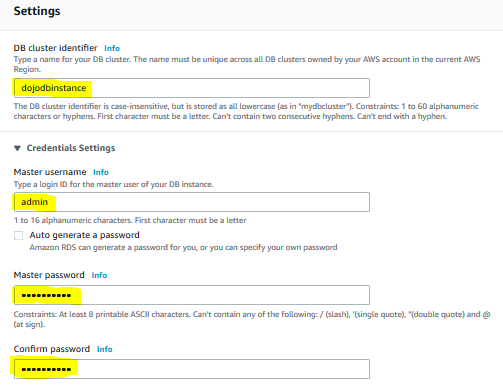
On the same screen, in the settings section, type in dojodbinstance for the identifier, type in admin for the user name and type in Password1! for the password.
-
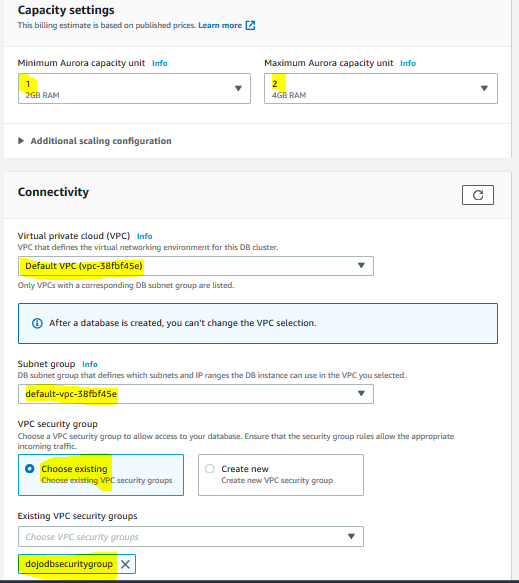
On the same screen, in the capacity and connectivity sections, set Aurora Capacity Unit between 1 to 2. Select Default VPC for the VPC. Select Default Subnet Group for the subnet group. For security group, select Choose existing option and select dojodbsecuritygroup security group.
-
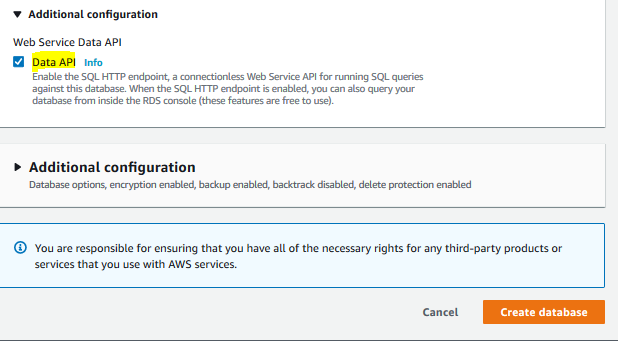
Finally select Data API option and click on the Create database button.
-
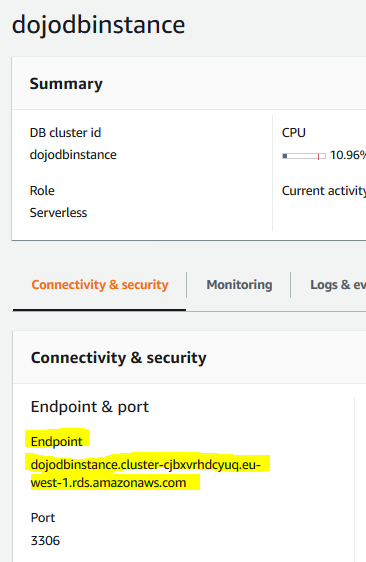
The database instance creation starts. Wait till the status changes to Available. Make note of the Endpoint for the database instance. You will need it later when configuring the DMS.
-
Next, click on the Query Editor menu option in the left.

-
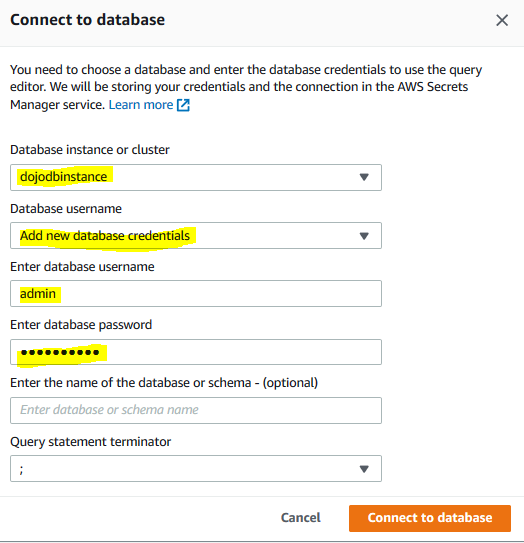
On the next screen, select dojodbinstance for the cluster. Select Add new database credentials for the database username. Type in admin as the username and Password1! as the password. Click on the Connect to database button.
-
The database is connected. Run the following SQL Statements to create dojodatabase database along with customers and employees tables. It also inserts sample data for the tables.
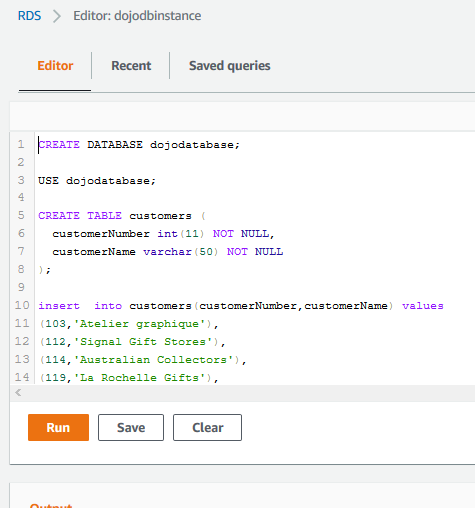
CREATE DATABASE dojodatabase;

USE dojodatabase;

CREATE TABLE customers (
  customerNumber int(11) NOT NULL,
  customerName varchar(50) NOT NULL
);

insert  into customers(customerNumber,customerName) values
(103,'Atelier graphique'),
(112,'Signal Gift Stores'),
(114,'Australian Collectors'),
(119,'La Rochelle Gifts'),
(121,'Baane Mini Imports');

CREATE TABLE employees (
  employeeNumber int(11) NOT NULL,
  lastName varchar(50) NOT NULL,
  firstName varchar(50) NOT NULL
);

insert  into employees(employeeNumber,lastName,firstName) values
(1002,'Murphy','Diane'),
(1056,'Patterson','Mary'),
(1076,'Firrelli','Jeff'),
(1088,'Patterson','William'),
(1102,'Bondur','Gerard'),
(1143,'Bow','Anthony'),
(1165,'Jennings','Leslie'),
(1166,'Thompson','Leslie');
- The database, tables and records for the tables are created. The source database instance is ready. It is time to create configure data migration service to migrate data from the RDS instance to the S3 bucket.
Step5: Create DMS Replication Instance
When starting the configuration for DMS, you start with creation of the replication instance for the DMS.
-
Goto the DMS Management console and click on the Create replication instance button.
-
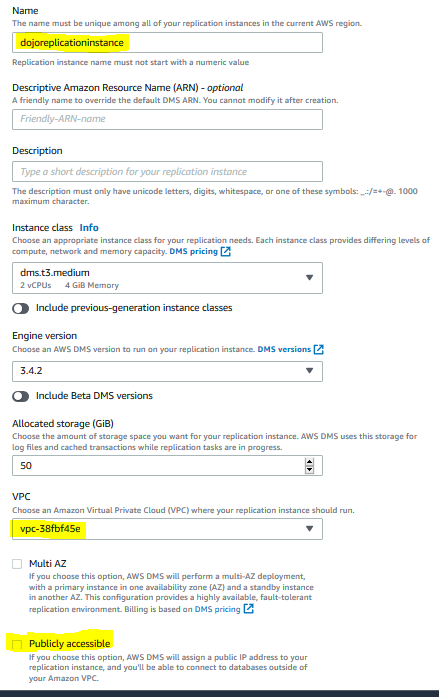
On the next screen, type in dojoreplicationinstance for the name. Select Default VPC for the VPC. Uncheck the Publicly accessible option. Keep rest of the configuration to the default and click on the Create button.
-
The replication instance creation will start. Wait till the status changes to Available. In the next step, you create endpoints to connect to the source (RDS) and the destination (S3 bucket).
Step6: Create Source and Destination Endpoints
In this step, you connect to the source (RDS) and the destination (S3 bucket) using endpoints so that data migration can be executed from one endpoint to the other.
-
In the DMS Management console and click on the Endpoints menu in the left and then click on the Create endpoint button.

-
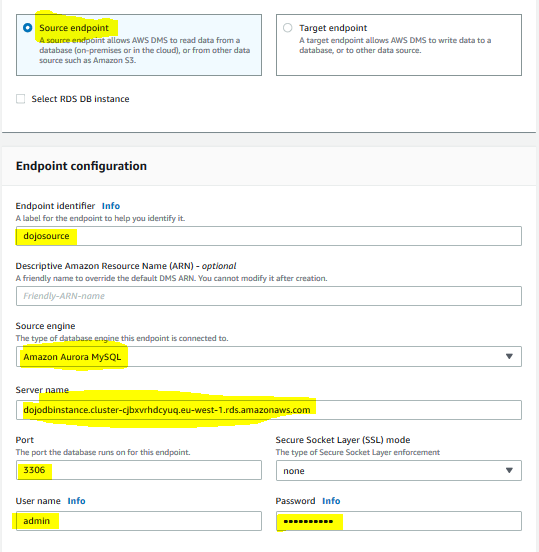
On the next screen, select Source endpoint option. Type in dojosource for the endpoint identifier. Select Amazon Aurora MySQL for the source engine. Copy-paste the RDS endpoint you made note of in the previous step for the server name field. Type in 3306 for the port. Type in admin for the user name and Password1! for the password. Finally click on the Create endpoint button.
-
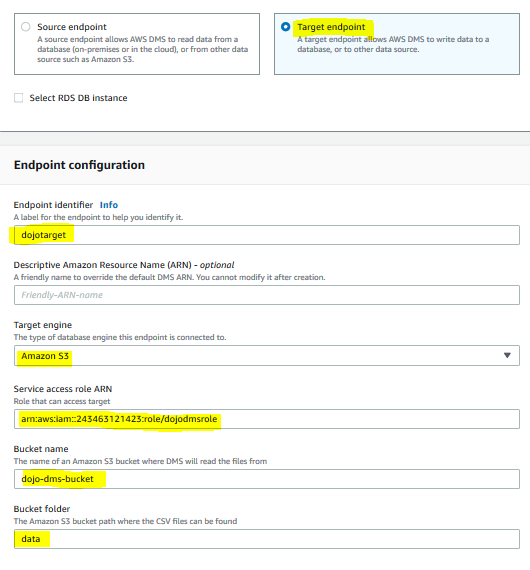
The source endpoint is created. Repeat step 1 to open the create endpoint screen again. Select Target endpoint option. Type in dojotarget for the endpoint identifier. Select Amazon S3 for the target engine. Copy-paste the ARN for the IAM Role dojodmsrole in Service access role ARN field. Type in dojo-dms-bucket for the bucket name. If you created bucket with a different name, then use that one. Type in data for the bucket folder. Finally click on the Create endpoint button.
-
The target endpoint is created. It is time to run the migration task to migrate data from the RDS instance to the S3 bucket.
Step7: Create and Run Replication Task
In this step, you create migration task using source and target endpoints to migrate the data from the RDS instance to the S3 bucket.
-
In the DMS Management console and click on the Database migration tasks menu in the left and then click on the Create task button.

-
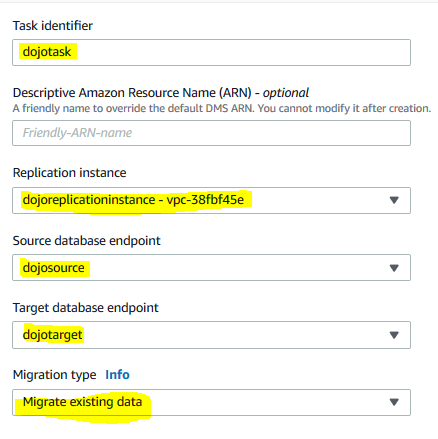
On the next screen, type in dojotask as the task identifier. Select dojoreplicationinstance as the replication instance. Select dojosource and dojotarget for the source and target endpoints respectively. Select Migrate existing data option for the migration type.
-
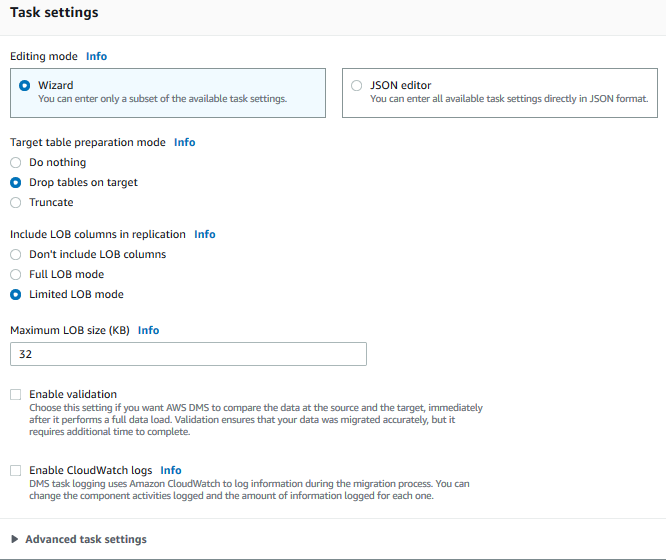
On the same screen, keep the Task settings to the default configuration.
-
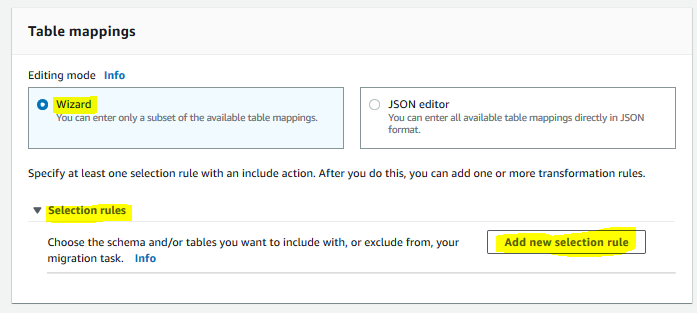
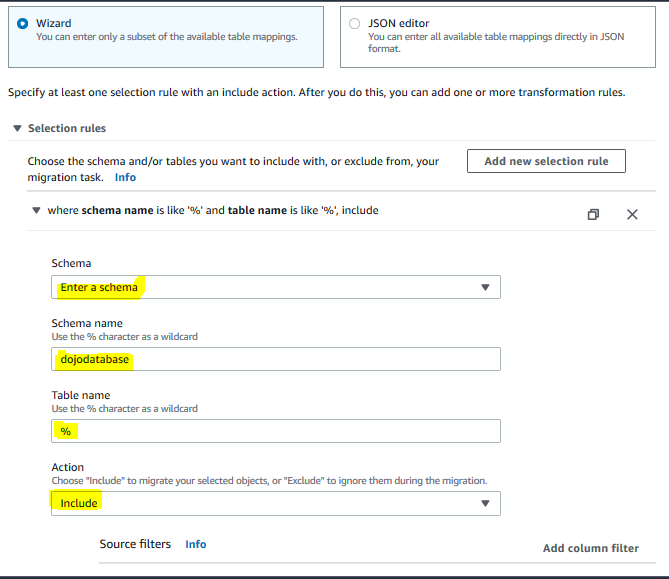
On the same screen, in the Table mappings section, select Wizard option. Expand Selection rules section and click on the Add new selection rule button.
-
On the rule screen, select Enter a schema for the schema. Type in dojodatabase for the schema. Type in % for the table name. Select Include for the action. Finally click on the Create task button.
-
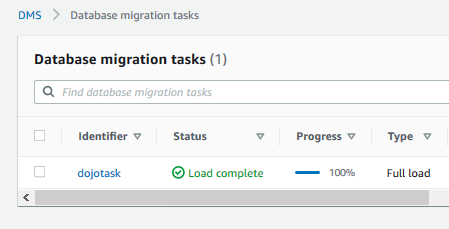
The task is created and it will automatically start the execution as well. Wait till the status changes to Load complete.
-
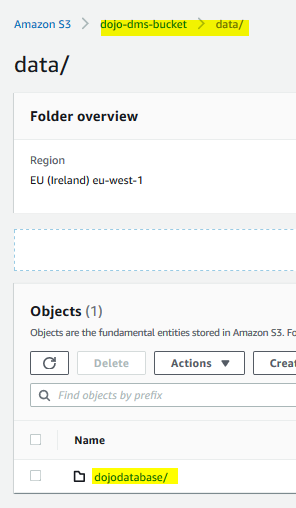
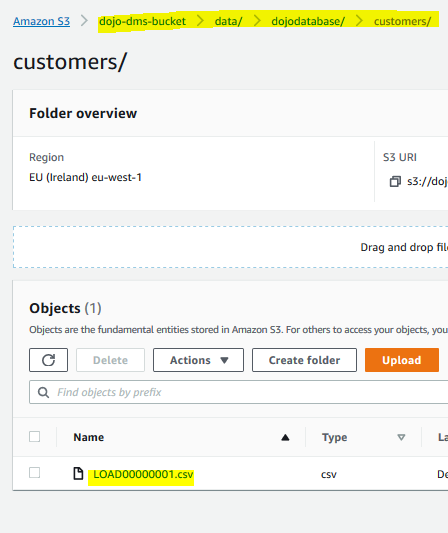
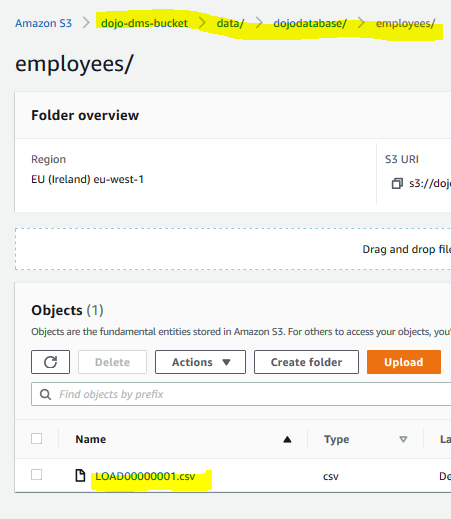
The data migration from RDS to S3 bucket is complete. If you go to the S3 bucket, you can see dojodatabase folder created under the data folder.
-
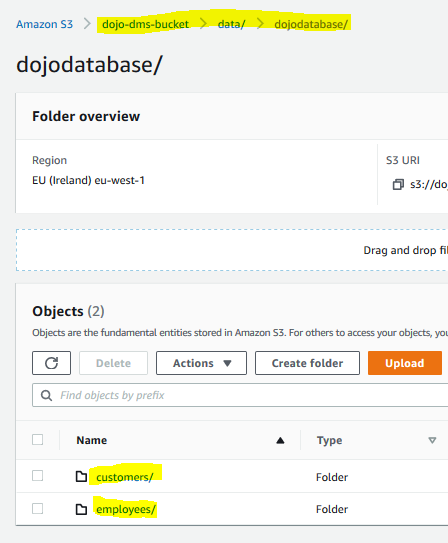
If you drill down further, you will see customers and employees folders for the customers and employees tables in the dojodatabase.
-
If you go further down to these respective folders, you can see the data files in CSV format. You can download and check the data in the files.
-
This finishes the exercise. Follow the next step to clean-up the resources so that you don’t incur any cost post the exercise.
Step8: Clean up
Delete dojotask DMS Migration Task.
Delete dojosource and dojotable endpoints.
Delete dojoreplicationinstance Replication Instance.
Delete dojodbinstance RDS Instance.
Delete dojo-dms-bucket bucket. If you created bucket with a different name then delete that one.
Delete dojodmsrole IAM Role.
Delete dojodbsecuritygroup Security Group.
Thanks and hope you enjoyed the exercise.

