The voice file and the development environment are ready. In this task, you use Amazon Transcribe APIs to convert the voice into the text.
-
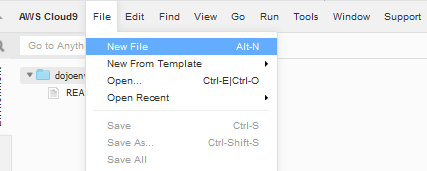
In AWS Cloud9 console, click on the New File option under the File menu.
-
A new Untitled1 file gets created. Write the following code in the Untitled1 file.
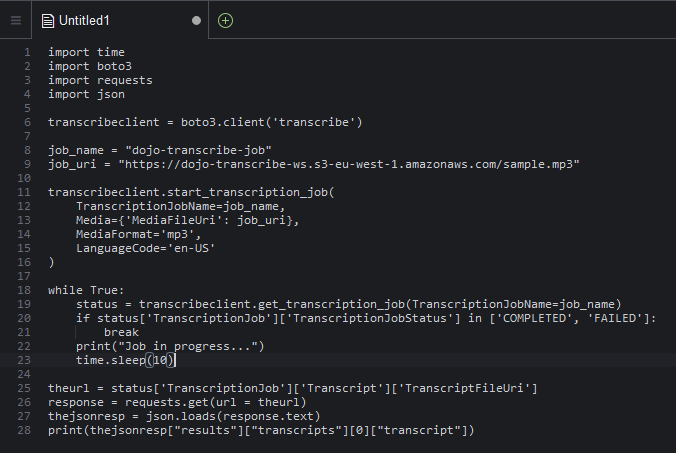
import time
import boto3
import requests
import json

transcribeclient = boto3.client('transcribe')

job_name = "dojo-transcribe-job"
job_uri = "https://dojo-transcribe-ws.s3-eu-west-1.amazonaws.com/sample.mp3"

transcribeclient.start_transcription_job(
    TranscriptionJobName=job_name,
    Media={'MediaFileUri': job_uri},
    MediaFormat='mp3',
    LanguageCode='en-US'
)

while True:
    status = transcribeclient.get_transcription_job(TranscriptionJobName=job_name)
    if status['TranscriptionJob']['TranscriptionJobStatus'] in ['COMPLETED', 'FAILED']:
        break
    print("Job in progress...")
    time.sleep(10)

theurl = status['TranscriptionJob']['Transcript']['TranscriptFileUri']
response = requests.get(url = theurl)
thejsonresp = json.loads(response.text)
print(thejsonresp["results"]["transcripts"][0]["transcript"])
`
-
In the code above, in the line 9, replace the URI with the S3 Object URL you made note of in the previous tasks.
-
The code is very simple. You create transcribe client and then use start_transcription_job to start the transcription job. The job takes job name, media location, media format and language code as the parameters. Once the job gets started, you loop in to keep checking the job status till it changes to COMPLETED or FAILED. When the job finishes or the status changes to COMPLETED, the job uploads the transcription to a S3 bucket. The code uses get_transcription_job method to fetch the job details which also includes the pre-signed S3 URL of the transcription. The code makes http request to the pre-signed URL to fetch the transcription details in the JSON format. The JSON contains loads of the details about the transcription. The code parses the JSON body to fetch the transcription text and print on the console.
-
Click on the Save option under the File menu. On the Save As popup, type in dojotranscribe.py as the file name and click on the Save button. The code is saved in the file.

-
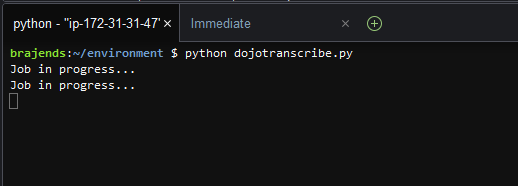
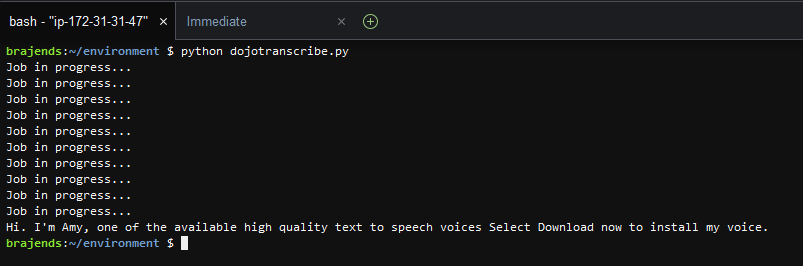
In the console window, execute python dojotranscribe.py command to run the dojotranscribe.py code. It will start the transcribe job and the job will take some time to complete. Wait till the job is over.
-
When the job is over; you can see the voice transcription printed on the screen. You can play sample.mp3 voice file to match the content.
-
This was a quick code to learn using Amazon Transcribe to convert the voice into the text. There are many more things you can do such as handling custom language modeling and custom vocabulary. We do plan to create a separate exercise on these customizations. You can also use Amazon Transcribe Medical to handle medical transcription. It is left for you to experiment. Please move to the next task to clean-up the resources so that you don’t incur any cost post the workshop.